ETH网络有正式版和测试版,正式版就是我们现在大家所熟知的ETH主网,那么我们使用的时候就会花真的money了,对于新手想开发合约来说,太贵了。还是用测试版吧,基本上就是免费的。
我查了下说,现在用的比较多的就是Rinkeby,那么我们就以Rinkeby来开始我们的在线开发吧。点击后面的区块浏览器,可以通过区块浏览器查询链上的信息
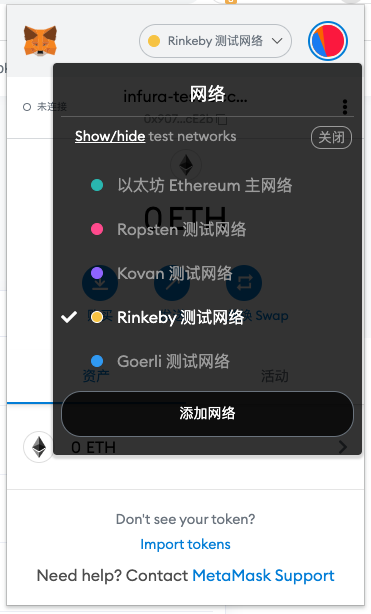
先在配置里面打开显示测试网络
之后你就会看到这几个测试网络,选择Rinkeby测试网络,在Rinkeby链上利用小狐狸,创建一个eth的账号
申请ETH做测试 我们有了自己的账号,但是没有eth该怎么办呢?,这些测试网络都有Faucet,可以去免费申请测试的eth。
例如在Rinkeby的测试网络环境下,我们可以找到类似的水龙头
https://faucet.rinkeby.io/ 这个需要发送twitter进行获得,经常不行啊。。。
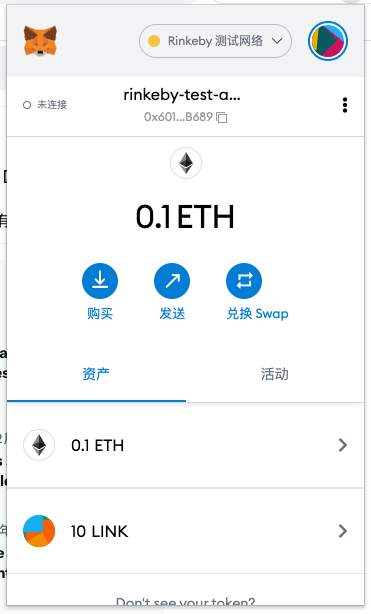
https://faucets.chain.link/rinkeby 这个做一下验证就可以获得0.1eth,对于我们日常使用来说应该就够用了。比较快,同时会获得10 test link的币。对于我们后续测试调用合约也可以使用。
尝试导入link token https://docs.chain.link/docs/link-token-contracts/
查看link的合约,在Rinkeby的测试网络,他的合约地址是 0x01BE23585060835E02B77ef475b0Cc51aA1e0709
那么我们就可以使用metamask直接导入该token
导入成功之后,我们就可以看到我们拥有了同时拥有了10个link的token
至此,我们应该就搭建完一个线上的免费测试环境。真实体验,应该会跟在主网使用是一样的。不知道当初直接在主网开发的人员会会有多爽?
使用web3js和Rinkeby进行交互 之前使用python web3的库的时候对比了下js的web3库,感觉js的好像更好用,所以这次教程就体验一下js的web3库,也可以做个横向的对比。
python:https://web3py.readthedocs.io/
JavaScript:https://web3js.readthedocs.io/
初始化环境 交互的库,js下有两个推荐的
https://docs.ethers.io/
https://web3js.readthedocs.io/
这次先使用web3js
需要你安装node,推荐使用nvm安装node,然后在安装 web3js的库
1
2
3
mkdir web3js cd web3js npm install web3
Rinkyby的测试网络的信息
RPC地址: https://rinkeby.infura.io/v3/9aa3d95b3bc440fa88ea12eaa4456161
链 ID :4
区块链浏览器查询: https://rinkeby.etherscan.io
使用web3js库 既然是对比和使用,想达到以下几种方式
进行余额查询
进行账号创建
进行签名转账
调用合约方法
ETH合约代码调用 余额查询 1 2 3 4 5 6 7 8 9 10 11 12 13 14 15 16 const Web3 = require('web3'); const web3 = new Web3(Web3.givenProvider 'https://rinkeby.infura.io/v3/9aa3d95b3bc440fa88ea12eaa4456161') const query_blance = async (account) => { const b_wei = await web3.eth.getBalance(account) blance = web3.utils.fromWei(b_wei, 'ether') return blance; }; (async() => { const account = '0x601f8D3853b94a062CE2eA960BB3a2F5D033B689' let blance = await query_blance(account) console.log(blance) })()
批量创建账号 https://web3js.readthedocs.io/en/v1.5.2/web3-eth-accounts.html
查看文档,这里有批量创建账号的接口,那么封装一下直接调用即可。
调用完会在本地存储account.csv 文件
1 2 3 4 5 6 7 8 9 10 11 12 13 14 15 16 17 18 19 20 21 22 23 24 25 26 27 28 29 30 31 32 33 34 35 36 37 38 39 40 41 42 43 44 const Web3 = require('web3'); const web3 = new Web3(Web3.givenProvider 'https://rinkeby.infura.io/v3/9aa3d95b3bc440fa88ea12eaa4456161') // 创建账号 const create_account = async () => { const account = await web3.eth.accounts.create(); return account; }; // 将创建的账号保存到本地csv文件 const save_csv_file = (accounts) => { let csv = `address,privateKey\n` for (let i = 0; i < accounts.length; i++) { const account = accounts[i] csv += `\n${account.address},${account.privateKey}` } const fs = require('fs'); fs.writeFile('account.csv', csv, function (err) { if (err) throw err; console.log('Saved!'); }); }; // 批量创建账号 const gen_multi_account = async (num) => { const accounts = [] for (let i = 0; i < num; i++) { const account = await create_account() accounts.push(account) } return accounts; }; // 调用批量创建账号 (async() => { const num = 2 const accounts = await gen_multi_account(num) save_csv_file(accounts) })()
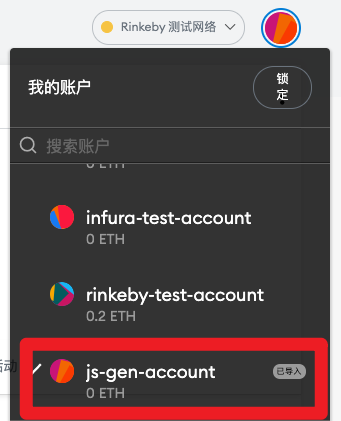
我测试生成了一个新的账号 0xb23B27077aC999924B460C374E5f9192B4fAF16E
通过metamask导入该账号,只需要复制私钥进去就好了
这样我这里就有了一个导入的账号了。
如果我想体验一下从rinkeby-test-account 转账到 js-gen-account那么可以在metamask直接操作,也可以使用代码进行操作
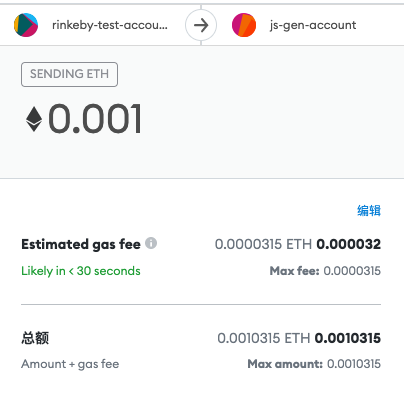
先测试在metamask操作,切换到 rinkeby-test-account 账号,然后对 js-gen-account转账
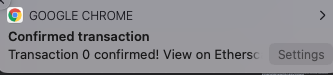
对其转账0.001,过一会等区块确认,应该就会转账成功
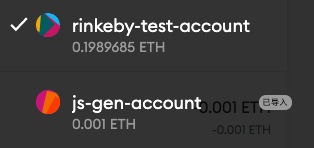
这里就显示成功转账了0.001到js-gen-account的账号
查看账户余额,已经到账。rinkeby-test-account一部分是转给了js-gen账号,另外一部分是消耗的gas费用。所以rinkeby账号会比转账0.001消耗的更多。可以看到下图,各种费用的使用明细。
通过区块链浏览器查询该笔交易
https://rinkeby.etherscan.io/address/0x601f8D3853b94a062CE2eA960BB3a2F5D033B689
通过查看我的测试地址交易信息,即可得到交易的信息。从我的账号1转到了账号2。
进行签名转账 那么如何使用js代码来进行转账呢?
查看文档,可以得知使用sendSignedTransaction来进行转账,那么直接上代码吧。批量转账到的话,可以调用封装一下
1
2
3
4
5
6
7
8
9
10
11
12
13
14
15
16
17
18
19
20
// 使用js代码进行转账 (async() => { const Web3 = require('web3'); const web3 = new Web3(Web3.givenProvider 'https://rinkeby.infura.io/v3/9aa3d95b3bc440fa88ea12eaa4456161') // 通过私钥进行转账 const privateKey = 'you_private_key' const account = web3.eth.accounts.privateKeyToAccount(privateKey) const to = '0xdC4981d82d6F1e9C6D72762CaBe828cd2A75De5A' const value = web3.utils.toWei('0.0005', 'ether') const tx = { from: account.address, to: to, value: value, gas: '210000', } const signedTx = await account.signTransaction(tx) const result = await web3.eth.sendSignedTransaction(signedTx.rawTransaction) console.log(result) })()
批量转账 1 2 3 4 5 6 7 8 9 10 11 12 13 14 15 16 17 18 19 20 21 22 23 24 25 26 27 28 29 30 31 32 33 34 35 36 37 38 39 40 41 42 43 44 45 const Web3 = require('web3'); const web3 = new Web3(Web3.givenProvider 'https://rinkeby.infura.io/v3/9aa3d95b3bc440fa88ea12eaa4456161') const privateKey = 'your_private_key' // 通过私钥进行转账 const send_transaction = async (to,amount) => { const account = web3.eth.accounts.privateKeyToAccount(privateKey) const value = web3.utils.toWei(amount, 'ether') gasPrice = await web3.eth.getGasPrice() console.log('gasPrice:', gasPrice); const tx = { nonce: await web3.eth.getTransactionCount(account.address), from: account.address, to: to, value: value, gas: 21000, gasPrice: gasPrice } const signedTx = await account.signTransaction(tx) const result = await web3.eth.sendSignedTransaction(signedTx.rawTransaction) console.log(result) return result } main = async() => { trans_account_list = [ '0xdC4981d82d6F1e9C6D72762CaBe828cd2A75De5A', '0x1BE0Cd87C567b0A5D26845Ab5F0c1EEfa384d613' ] amount = '0.002' // 批量发送转账 for (let i=0;i<trans_account_list.length;i++){ await send_transaction(trans_account_list[i],amount) } } main()
代币LINK合约方法调用 通过上面的代码,我们已经实现了eth的转账,那么下一步我还想实现基于eth代币的一系列操作。我们在领取eth的同时,也领取了10个LINK。那么我们该如何在账号之间对LINK进行转账呢?
先查看文档:https://web3js.readthedocs.io/en/v1.5.2/web3-eth-contract.html
然后查找LINK在Rinkeby上的合约地址:
https://docs.chain.link/docs/link-token-contracts/#ethereum
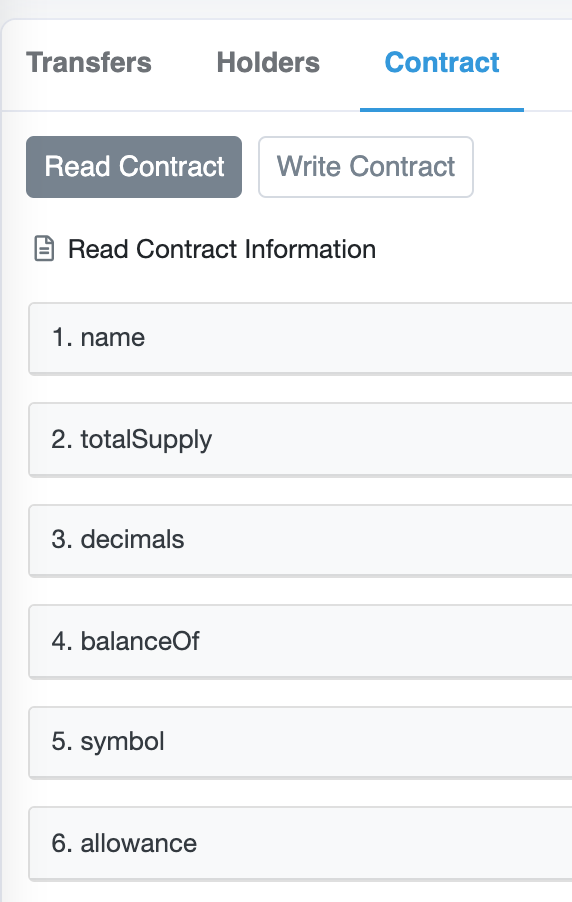
利用区块链浏览器去查看合约方法
https://rinkeby.etherscan.io/address/0x01BE23585060835E02B77ef475b0Cc51aA1e0709
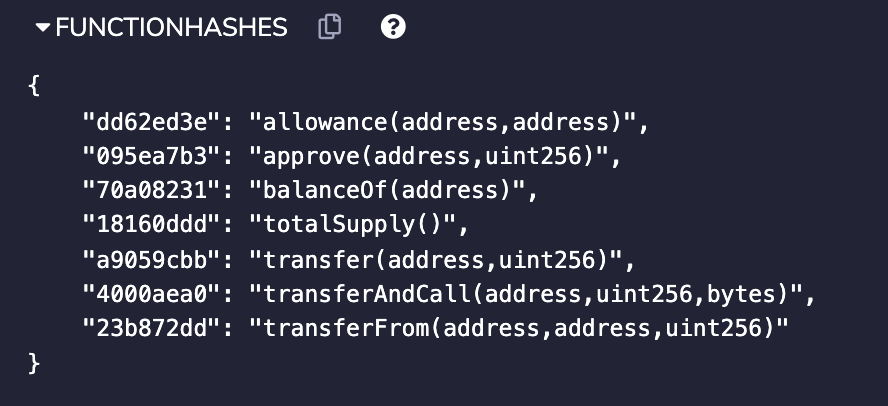
就看到了合约的方法名
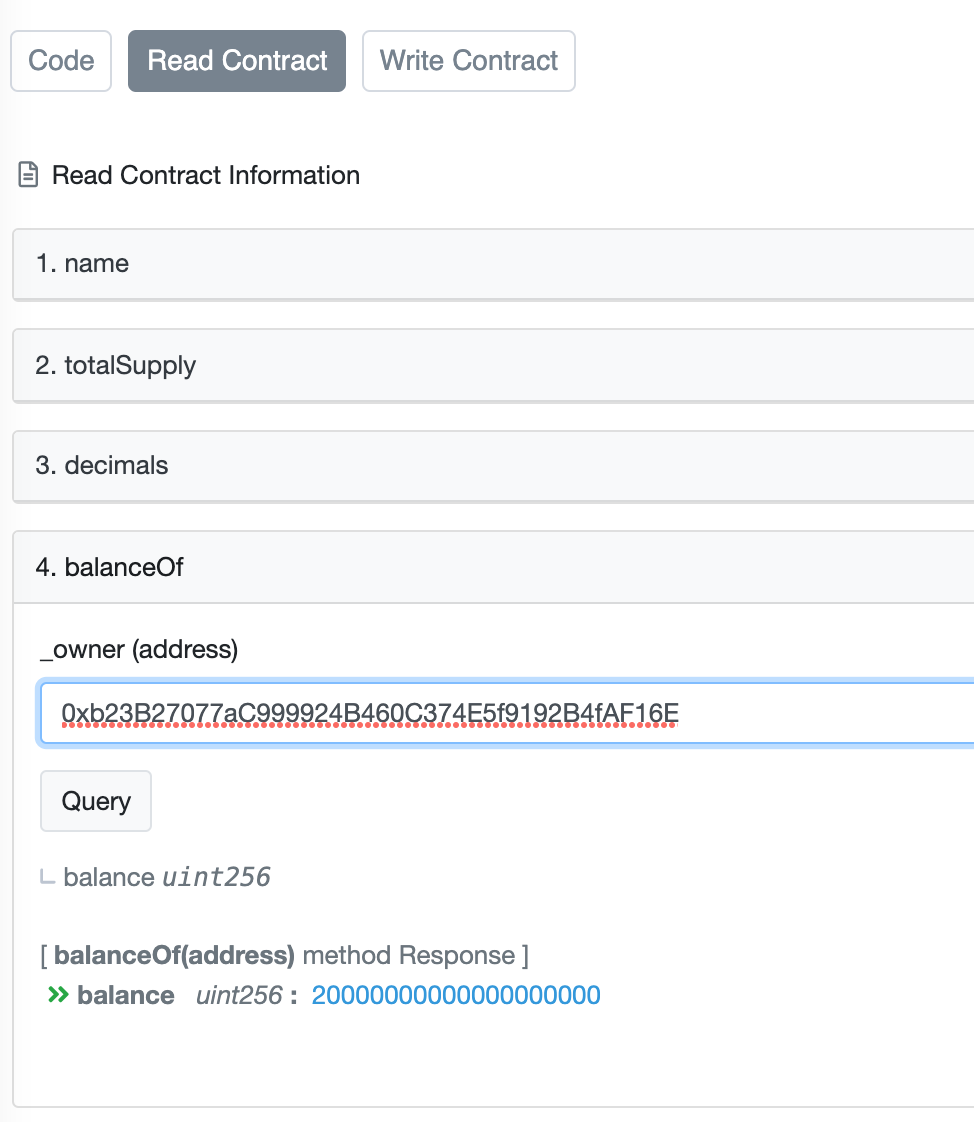
区块浏览器查询代币LINK的余额 有一个balanceOf的方法,点击就可以查询相应的地址的余额,我的这个账号里面有20个LINK。所以就查出来了。这里的单位应该是wei, 1eth = 1^18 wei
https://rinkeby.etherscan.io/unitconverter?wei=20000000000000000000 转换一下就是 20 LINK
那么如何使用代码来交互呢?看文档示例:
1
2
3
4
5
6
7
8
9
10
11
var Contract = require('web3-eth-contract'); // set provider for all later instances to use Contract.setProvider('ws://localhost:8546'); var contract = new Contract(jsonInterface, address); contract.methods.somFunc().send({from: ....}) .on('receipt', function(){ ... });
这里需要一个jsonInterface,和address
应该就是ABI和合约地址,从上述区块链浏览器中已经得知
https://rinkeby.etherscan.io/address/0x01BE23585060835E02B77ef475b0Cc51aA1e0709#code
合约地址:0x01BE23585060835E02B77ef475b0Cc51aA1e0709
ABI的话可以直接copy:到本地存为一个json文件
编写代码 1 2 3 4 5 6 7 8 9 10 11 12 13 14 15 16 17 18 19 20 21 22 23 24 25 26 const Web3 = require('web3'); const web3 = new Web3(Web3.givenProvider 'https://rinkeby.infura.io/v3/9aa3d95b3bc440fa88ea12eaa4456161') // read json file const fs = require('fs'); const path = require('path'); const filePath = path.join(__dirname, './link-abi.json'); const jsonfile = JSON.parse(fs.readFileSync(filePath, 'utf8')); // json encode const abi = JSON.parse(jsonfile.result); // 合约地址 const address = '0x01BE23585060835E02B77ef475b0Cc51aA1e0709' // 需要查询的合约地址 const query_address = '0xb23B27077aC999924B460C374E5f9192B4fAF16E' main = async () => { const contract = new web3.eth.Contract(abi, address) let result_wei = await contract.methods.balanceOf(query_address).call() let result = web3.utils.fromWei(result_wei, 'ether') console.log(result); } main() //最后输出20
进行代币转账测试 通过https://remix.ethereum.org/ 把合约代码放进去编译可以得到他的一些方法
那么当前合约就有以上的一些方法。我们看一下代币转账的合约代码。本质上就两个参数转账即可,一个是to地址,一个是转账的数目,这里是unit256,对应的应该就是wei了
1
2
3
4
5
6
7
8
9
10
11
/** * @dev transfer token for a specified address * @param _to The address to transfer to. * @param _value The amount to be transferred. */ function transfer(address _to, uint256 _value) returns (bool) { balances[msg.sender] = balances[msg.sender].sub(_value); balances[_to] = balances[_to].add(_value); Transfer(msg.sender, _to, _value); return true; }
那么就依葫芦画瓢来测试一下
address1:0xb23B27077aC999924B460C374E5f9192B4fAF16E 有20个LINK,作为from地址
address2:0xdC4981d82d6F1e9C6D72762CaBe828cd2A75De5A 0个LINK,作为to地址
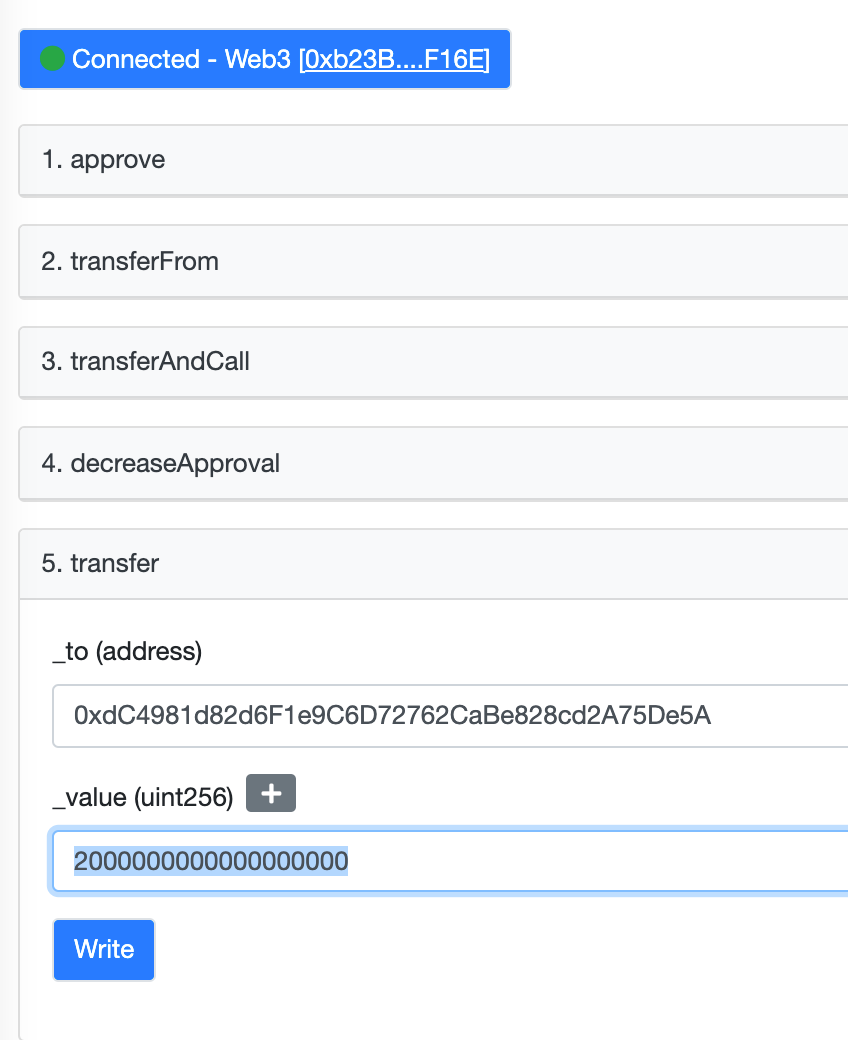
在区块链浏览器可以直接使用write contract 进行转账测试
1.链接上address1的小狐狸
2.输入地址转账
3.需要将金额转换成wei
如下图所示,我们先链接小狐狸,然后进行调用合约转账即可,这里的2000000000000000000对应2个LINK
通过区块链浏览器查询:https://rinkeby.etherscan.io/tx/0xa99c1fe0b3f693c6aa4948be833c8f8ebd849f878eaaee6864a993abcd6c1cf0
就看到转账成功了。
使用代码进行转账 1 2 3 4 5 6 7 8 9 10 11 12 13 14 15 16 17 18 19 20 21 22 23 24 25 26 27 28 29 30 31 32 33 34 35 36 37 38 39 40 41 42 43 44 45 46 const Web3 = require('web3'); const web3 = new Web3(Web3.givenProvider 'https://rinkeby.infura.io/v3/9aa3d95b3bc440fa88ea12eaa4456161') // read json file const fs = require('fs'); const path = require('path'); const filePath = path.join(__dirname, './link-abi.json'); const jsonfile = JSON.parse(fs.readFileSync(filePath, 'utf8')); // json encode const abi = JSON.parse(jsonfile.result); const privateKey = '0x20ce5d52d6a86943041a0a71fd9e3fe262e0585d9a9267205331df1da0bd6b6e' // 转换单位 let amount = web3.utils.toWei('5', 'ether') console.log("amount", amount); const to = '0xdC4981d82d6F1e9C6D72762CaBe828cd2A75De5A' contract_address = '0x01BE23585060835E02B77ef475b0Cc51aA1e0709' main = async () => { const contract = new web3.eth.Contract(abi, contract_address) // transfer const account = web3.eth.accounts.privateKeyToAccount(privateKey) gasPrice = await web3.eth.getGasPrice() console.log('gasPrice:', gasPrice); // 发送合约执行信息到合约地址 const tx = { nonce: await web3.eth.getTransactionCount(account.address), from: account.address, to: contract_address, value: "0x0", gas: 220000, gasPrice: gasPrice, data: contract.methods.transfer(to, amount).encodeABI() } console.log(tx); // 进行签名,并发送转账 const signedTx = await account.signTransaction(tx) const result = await web3.eth.sendSignedTransaction(signedTx.rawTransaction) console.log(result) } main()
至此,我们就完成再区块链上调用合约,并进行转账了。
同理应该就可以扩展到bsc链,进行合约的调用。